Decal Installation Instructions
Now that you have purchased one of our Vinyl Decals, you are wondering how to install it on your glass. Our Decal Installation instructions are simple and will only take a couple of minutes to complete. First and foremost is that you do not allow the paper backing of the decal to get wet. It will stick to your decal and it will be ruined.
Step By Step Decal Installation Instructions
- Do Not Allow the Paper backing on the decal to get wet or it will be ruined!
- Clean hands and the surface area where the decal will be applied.
- Spray area generously with glass cleaner or “very light” soapy water mixture. The wetter the better as a substantial amount of fluid is required between the decal and surface to give an even appearance once fully dry. Therefore DO NOT INSTALL ON A DRY SURFACE.
- With dry hands remove the paper backing from the decal. Apply decal, shiny side to the wet surface. It will not adhere to the etched side.
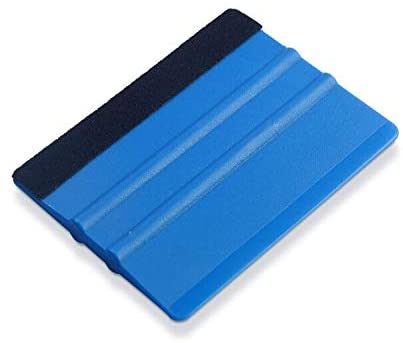
- Using a felt-tipped squeegee, work from the center outward and squeegee all excess moisture and air out. Carefully, so as not to move the wet decal out of position, wipe the surrounding area with a lint-free cloth. IF a rubber squeegee is not available you can use a credit card that has smooth edges. We recommend spraying the etched side of your decal with the solution as well so it does not scratch.
- If tiny air bubbles appear, remove the decal and repeat steps 3-5 making sure to generously wet the surface, then proceed with the squeegee process. Any excess moisture should evaporate within 24 hours.
- Clean your windows as you normally would right over your decal. To preserve its beautiful appearance, it is recommended to use a window cleaner that does not contain ammonia or use a light soapy water mixture.
Plastic or Tinted windows:
Please check with the window manufacturer before applying window cleaner to any plastic surface. If window cleaner cannot be used, a very light soapy water solution is recommended for installation. Tinted windows Your decoration may give a more desirable appearance on the exterior surface especially if the tint is dark.
Decal Removal & Storage:
At an edge carefully lift away from the surface and gently peel it off making sure not to pull too hard as it may stretch it. For reuse do not roll the decal up against itself. Simply place the dry shiny side of it back onto the shiny side of the original backing paper it came on and then store.
General Information:
If at any time bubbles occur, just peel back the affected area and reapply. If an edge refuses to lay flat use a hairdryer to heat slightly and smooth it down with moisture, This works equally as well when reapplying the entire decal after removal and storage of it but do not overheat it.